
Customizing Google AMP for WordPress
- Introduction
- Styling Your AMP Pages
In the introduction to this series, we gave a brief overview about Google AMP as well as a couple of foundational customizations. If you haven’t checked out that post yet, I encourage you to head there first since the section on “Customizing Templates” will be key for the rest of this series.
Where did the stylesheet go?
Now that you’ve got the AMP plugin installed on your site, I encourage you to visit the AMP view for one of your pages (or visit the AMP view of one of our posts) and right-click on the page to select “View Page Source”.
Your AMP pages will have no linked stylesheets in the <head> of your site!
When looking at the page source on your main site, you’ll notice that there are multiple stylesheets being loaded via a <link> tag.

When looking on your AMP generated pages, you’ll notice that there aren’t any <link> stylesheets in the header. They are not allowed when using AMP (there is a single exception here for whitelisted font providers such as Google Fonts)
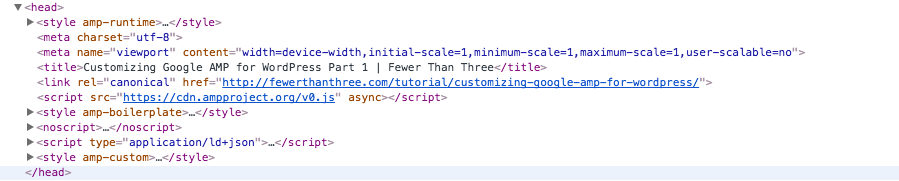
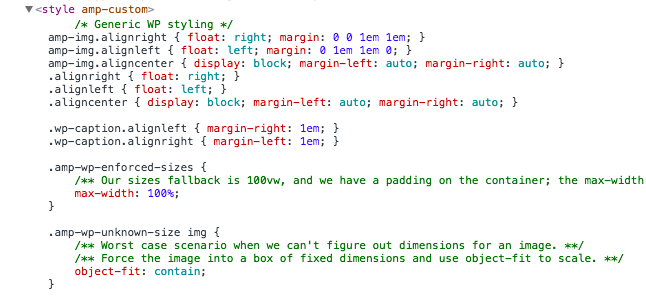
Styles are output directly in the head within a <style amp-custom> tag
I know, I know. Some of you may have an instant gut reaction to this being “bad practice”. The reality is, best practices are flexible and dependent upon specific requirements and current demand.
When using AMP, the primary requirement is speed and performance, so this is the best approach and “best practice” in this scenario.
Rules for CSS and AMP
Before we start digging into how to customize the styles for your AMP pages, we should take a moment to recognize that there are a few rules we’ll need to follow in the CSS for our AMP pages.
Here are a couple of common issues from the “Disallowed Styles” notes that I ran across:
Never use “!important” to force a style
This should mostly be avoided in our regular CSS practices, however it especially should be avoided here due to performance issues.
Use of pseudo elements
pseudo elements (:hover, ::before, :nth-child, etc.) can be used here. However, they can only be used when referencing a tag directly.
For example:
Good = a:hover, div::before
Bad = .my-custom-link-class:hover
Check out the full documentation to see all of the CSS concerns when styling for AMP pages.
Customizing the AMP for WordPress styles
If you followed the first post in this series, you should now have a new folder (within your plugin or your theme) where you can customize the default templates that are delivered with the AMP plugin.
Using the default “style.php” file
Sure, you can use the default “style.php” template to customize the AMP styles on your site (jump to the next section to see my alternatively preferred method). Just make whatever modifications you need directly to your version of that file, following the AMP specific CSS rules listed above, and you’ll be good to go.
Using a CSS preprocessor
If you’re like me, you rely heavily on the variables (for me Sass) defined for your projects. Something as simple as setting hex colors can become a pain when you have to manually set them rather than relying on the same calculations used throughout the rest of your site.
- Create an “amp.scss” file at the same location where your main “style.scss” is defined
- Include only the styles required for your amp pages within this file
- Compile it!
Once you have your “amp.css” file compiled, you can use “file_get_contents” to output that directly into your “single.php” AMP template. The new <style amp-custom> would look like the following:
This file contains bidirectional Unicode text that may be interpreted or compiled differently than what appears below. To review, open the file in an editor that reveals hidden Unicode characters.
Learn more about bidirectional Unicode characters
| <?php | |
| <style amp-custom> | |
| <?php echo file_get_contents( get_stylesheet_directory_uri() . '/amp.css' ); ?> | |
| <?php do_action( 'amp_post_template_css', $this ); ?> | |
| </style> |
Leave a Reply